
Craft Hack: DIY Speckled Yarn!
/Speckled yarn has been all the craze this year, the more multi-colored the better! There are so many amazing indie dyers who create beautiful hand-dyed color combinations -- some of my absolute faves are The Wool Kitchen (oh how I wish they were here in the US so I wouldn't have to brave the customs fees!), Lush Knit (her shop updates sell out in minutes, I have yet to score a skein!), and The Lemonade Shop (here's the yarn I splurged on from her). With skeins averaging $28 plus shipping, these gorgeous yarns are a rare treat rather than a regular indulgence. But what if you're crazy for speckled yarn and need an alternative? This DIY craft hack is here to solve (almost) all your yarn needs!
This past weekend I saw Brooklyn Craft Company post a series of photos on Instagram showing how to easily DIY your own speckled yarn. After reading their detailed blog post, I was already ordering the SEI Tumble Dye Neon Colors Set on Amazon (enough to make SO many speckled skeins!) for same-day delivery and heading over to my local yarn shop to pick out some white yarn to play with. The process involves using a water-based paint in a spray bottle to add flecks to your yarn, and then applying heat to seal it in. Most people use this spray paint for easy tie-dying, but it can be used on lots of different materials including fabrics, paper, ribbon, wood, etc.
Monday I started the DIY, and by Tuesday I had a gorgeous speckled yarn cake. So cool! I thought it would be helpful to walk you through my experience in case you decide to try it too. (Make sure to read Brooklyn Craft Company's blog post first so you're familiar with the process, since I won't be explaining every detail of their tutorial here).
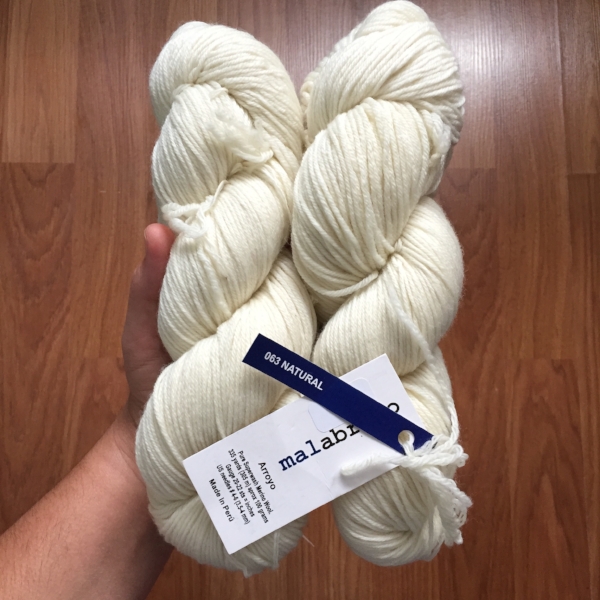
The tutorial suggested using an animal fiber yarn, preferably wool, for this DIY, so I chose this super soft and light Malabrigo Arroyo yarn in Natural. Of all the yarns at the store it had the prettiest creamy white color, and being superwash and sport weight it's really versatile. It's a little pricey at $19, so if there's a white wool yarn you love at a lower price, go for it! I also bought a skein of cotton yarn to test in the future -- if the dye is meant for tie-dying cotton shirts, why not cotton yarn? I'll add an update to this post once I give it a try!

The spraying process is pretty fun and goes quickly. I originally thought I would be conservative and only spray a few key spots in a couple of colors, but with eight pretty colors to choose from in the set, I decided to go full rainbow and try them all. I'm generally not the hugest fan of dark blue or purple in speckled skeins so I tried to go light with those, and even still I wound up spraying more of the hot pink over the blue and purple after this pic to subdue those colors. I sprayed from about a foot above the yarn to get true speckles. The closer you spray the more the paint is concentrated, giving distinct sections of color as opposed to speckles. The tutorial says to use your fingers to spread out the yarn and disperse the color as you go, but I decided to spray one side and then flip it over and spray the other. This paint only coats the surface of the yarn, it doesn't saturate it like traditional yarn dyeing, so with this method you can have a single strand of yarn with one color on the front half and a different on the back half.

I picked up the yarn, sprayed a few spots that needed a bit more color, and then it was done! I love that hot pink so much! This paint reminds me of the puffy paint we used to play with in art class as a kid. Maybe it's all that 1980's neon?

Hanging it up in the bathroom to dry, I was impressed at how it already looked like one of those fancy speckled skeins I lust after! The air drying time was quick, but I let it dry for a few hours extra just to be sure. Once done, I could feel that the sections with the most paint were a tiny bit stiff, but not clumping. The rest was still super soft.

I laid out the yarn and placed a very thin beach towel over it. The colors of the towel were close enough to those in the yarn that if any color transferred it wouldn't be too obvious. I put the iron on the wool setting equivalent (number 3, or halfway around the dial), and laid it on a section at a time without applying too much pressure (I read that too much pressure can cause wool to start looking shiny), moving to the next section when the red light started to blink to indicate the iron had stayed in one place for too long, about 1-2 minutes. I didn't do the typical ironing movement because that would disperse the heat too much, and might irritate the yarn, causing it to felt. Normally when using this spray paint for tie-dying you place your finished shirt in the dryer for 20 minutes to create the heat seal. I was concerned this makeshift ironing wasn't going to provide that level of heat, so I spent quite a while on this ironing method, flipping the yarn halfway through the process to make sure I was getting the heat to every strand. After enough time I hung it up to cool.

I debated for several hours whether to wash the yarn or just cake it up and get to crocheting (the really satisfying part!). The tutorial didn't indicate I needed to wash it, and doing so was going to add time to the project and was only going to result in one of three things -- either the color would stay, it would wash out, or it would combine into a colored mess. With any of those outcomes, there's not much I could do to change it. In the end, I decided to be diligent and give it a wash. The finished result would determine what I wound up crocheting it into.

Yarn noodle soup!
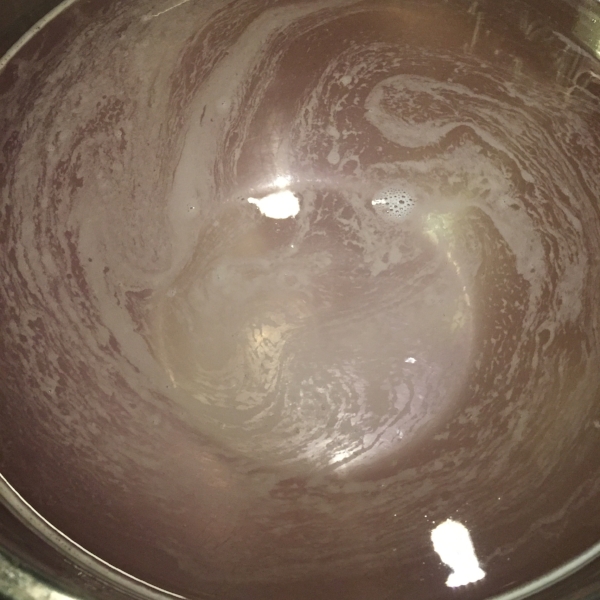
The washing water wound up being a slight purple-pink color, nothing too bad, and the strands kept their color. If anything, they faded just a little. I rolled the yarn up into the towel to squeeze it dry, and a little bit of the pink color transferred to the towel as well. Not a big deal since it matche the colors already in the towel, but definitely something to keep in mind when you try this yourself.
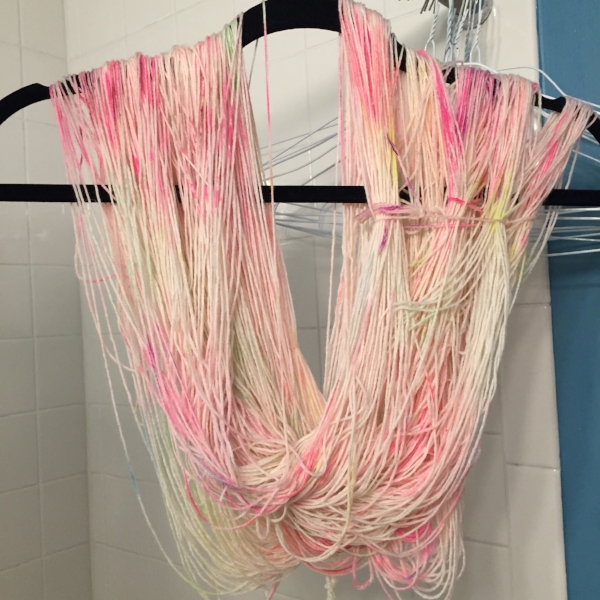
Hanging it up to dry overnight (it wound up needing to sit in front of a window fan for a little bit the next day to fully dry), you can see that the color is not as intensely saturated as before, although that's in part because the strands are now more separated. It gives it a little more of a watercolor look, which I like.

All caked up and ready to go! I love how pretty the dispersed neon colors are. The spray paint definitely sits on top of the strand, rather than saturating through. I like that it gives it a painterly look.

Here's how the colors disperse when crocheted. I couldn't be happier! It's exactly as I hoped it would look. After making this swatch, I'm thinking maybe it wants to be a lightweight sweater... time to buy more yarn and get to speckling!
This was such a fun quick project (only 24 hours to complete) with really satisfying results. I could totally imagine having a yarn speckling party with a bunch of friends in the backyard this summer. It would be cool to see everyone's color combos!
To recap, here are some main things to keep in mind when you DIY your own speckled yarn:
- Your first-time results turn out really beautiful, so don't be afraid to use a nice yarn. That said, you don't have to spend a lot! Use a washable wool that's in your price range.
- Consider trying this method on a cotton yarn (I'll let you know how mine goes!)
- Don't be afraid to go bold with the colors, they wash out just a little and disperse throughout the skein.
- Use as much heat as you can to seal in the paint without harming the yarn. The longer you apply the heat, the better the seal.
- Wash the yarn before you cake it so you can see what the true colors will be.
- Use a towel that you don't care too much about when you dry the yarn -- a little of the color may transfer.
I'm excited to get started on my next skein! This DIY felt like a fun little prep course in the color distribution choices a professional dyer makes (theirs is a way more involved dyeing process!). I would love to hear how your DIY speckling goes -- feel free to comment below or tag me on Instagram with your finished project!